Embedded Viewer
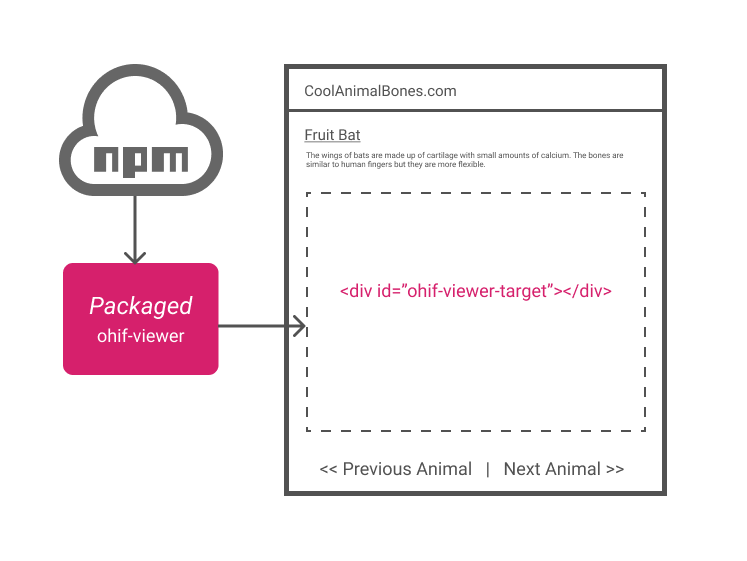
The quickest and easiest way to get the OHIF Viewer up and running is to embed it into an existing web application. It allows us to forego a "build step", and add a powerful medical imaging viewer to an existing web page using only a few include tags. Here's how it works:

- Create a new web page or template that includes the following external dependencies:
- Create a JS Object or Function to hold the OHIF Viewer's configuration. Here are some example values that would allow the viewer to hit our public PACS:
// Set before importing `ohif-viewer` (JS Object)
window.config = {
  // default: '/'
  routerBasename: '/',
  servers: {
    dicomWeb: [
      {
        name: 'DCM4CHEE',
        wadoUriRoot: 'https://server.dcmjs.org/dcm4chee-arc/aets/DCM4CHEE/wado',
        qidoRoot: 'https://server.dcmjs.org/dcm4chee-arc/aets/DCM4CHEE/rs',
        wadoRoot: 'https://server.dcmjs.org/dcm4chee-arc/aets/DCM4CHEE/rs',
        qidoSupportsIncludeField: true,
        imageRendering: 'wadors',
        thumbnailRendering: 'wadors',
      },
    ],
  },
};
To learn more about how you can configure the OHIF Viewer, check out our Configuration Guide.
Render the viewer in the web page's target
div
// Made available by the `@ohif/viewer` script included in step 1
var containerId = 'id-of-div-to-render-component-to';
var componentRenderedOrUpdatedCallback = function() {
  console.log('OHIF Viewer rendered/updated');
};
window.OHIFViewer.installViewer(
  window.config,
  containerId,
  componentRenderedOrUpdatedCallback
);
You can see a live example of this recipe in this CodeSandbox.
Add Extensions
The UMD build of the OHIF Viewer is a "light weight" build that only contains the core extensions required for basic 2D image viewing. It's possible to add other extensions at runtime.
This only requires us to include a single script tag, and add it using the
extensions key to our config. In this practical example, we register our
popular whole slide microscopy extension:
<script
  src="https://unpkg.com/@ohif/extension-dicom-microscopy@0.50.5/dist/index.umd.js"
  crossorigin
></script>

<!-- --->
<script>
  window.config = {
    // ...
    extensions: [OHIFExtDicomMicroscopy],
  };
</script>
You can see an example of a slide microscopy study in the viewer with the extension enabled here (source code) and without it here (source code).
You can read more about extensions and how to create your own in our extensions guide.
FAQ
I'm having trouble getting this to work. Where can I go for help?
First, check out this fully functional CodeSandbox example. If you're still having trouble, feel free to search or GitHub issues. Can't find anything related your problem? Create a new one.
My application's styles are impacting the OHIF Viewer's look and feel. What can I do?
When you include stylesheets and scripts, they are added globally. This has the
potential of causing conflicts with other scripts and styles on the page. To
prevent this, embed the viewer in a new/empty web page. Have that working?
Good. Now embed that new page using an
<iframe> element.
This should produce the expected result while also protecting your page from any globally defined styles/scripts.
We're trying to embed the OHIF Viewer into an existing React App, but seeing react-dom and react conflicts. What can we do?
If you are installing OHIF viewer inside another react app, you may use installViewer as follows:
import { installViewer } from '@ohif/viewer'

const ohifViewerConfig = window.config // or set it here
const containerId = 'ohif'
const componentRenderedOrUpdatedCallback = function() {
    console.log('OHIF Viewer rendered/updated');
};

componentDidMount() {
   installViewer(
      ohifViewerConfig,
      containerId,
      componentRenderedOrUpdatedCallback
    );
}

render () {
   ...
   //you can render in any element you wish
   <AnyTag id={containerId}/>
}
installViewer is a convenience method that pulls in some dependencies that may
not be compatible with existing react apps. @ohif/viewer also exports App
which is a react component that takes the configuration outlined above as
props. You can use it as a reusable component, and to avoid react version
conflict issues.